Assembly of Bar Stools
By Clemency Hitchings, 13th July, 2010
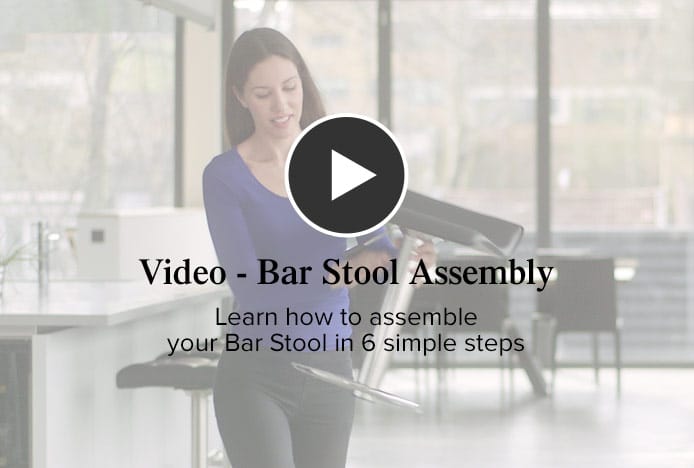
Although some of our bar stools are received readily assembled for immediate use, the vast majority of those we provide do require a degree of basic assembly. In this handy video and article, we will take you through the simple, six-stage procedure of assembling a standard gas lift stool, starting from the contributing components right through to the finished product.

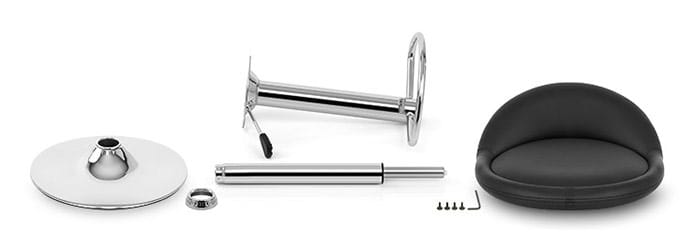
Stools are usually delivered either two to a box or as a single. However, in the event that your order is for an odd number that usually come in pairs, we will always split the box and repack the stool to a high standard. Typically, individual gas lift bar stools are only composed of four or five individual components. As illustrated from left to right in the image below, these parts will include a base, a decorative collar and a tubular stem featuring the gas lift lever and footrest. Additionally, there is a hydraulic gas lift column, a seat pad and finally the necessary screws with accompanying Allen key, which is conveniently the only required building tool.
Despite the fact that it may differ very slightly between designs, the general assembly process is extremely straightforward and should only take a matter of minutes if the instructional steps and visual information below are referred to correctly.

Assembly Stages 1-3
Firstly, upon receiving your order, it's a good idea to initially unpack and remove all of the separate elements from the packaging and lay them out on the floor.

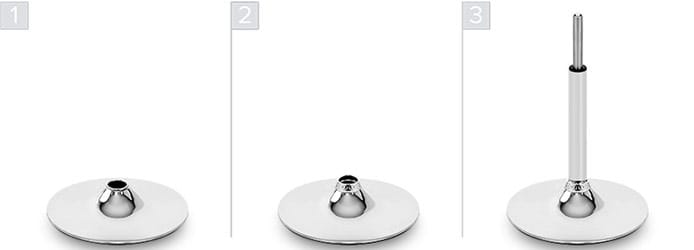
As shown in Figure 1, the first step is to take the round base and place it flat side down, so that the protective underside ring is in contact with the floor and the central hole is facing upward.
If a decorative collar is included, place it on top of the raised hole within the base. However, if it is not part of your chosen stool design then simply move straight on to the third stage.
As illustrated in Figure 3, take the hydraulic gas lift column and slot it through the collar and into the hole within the base until secure. With some stools, there is a small, plastic protective cap positioned on the end of the gas cylinder that will need to be removed before moving on to the next stage. Doing so should expose what resembles a small button, which will eventually activate the gas lift mechanism and enable the stool's height adjustment and swivel capabilities.

Assembly Stages 4-6
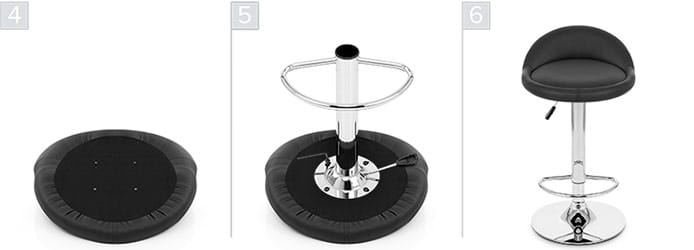
The seat now needs to be attached to the main part of the stem. To do so, we recommend laying the seat upside down on a soft surface and locating the position of the four screw holes on the underside of the seat pad.
Demonstrated in Figure 5, the stem needs to be held upside down so that it rests on the seat and the four screw holes are lined up with those on the metal plate. As the majority of designs has an integrated footrest, when lining up the holes it is important to ensure that it is facing the correct direction on the stem. Once in position, take the four screws and finger tighten each through the plate and into the seat to enable further adjustment of the footrest if necessary. When completely satisfied with the placement, use the supplied Allen key and complete tightening until the stem and seat are secured.
Next, take the attached stem and seat and place it over top of the hydraulic gas lift column ensuring that they are completely vertical. Resembling Figure 6, you will now need to sit on the stool's seat and pull the lever beneath it. Whilst remaining seated, we recommend that you gently bounce up and down until the lever has located and activated the gas lift mechanism. Once the two are engaged, you should notice that the seat lowers. When this occurs, dismount the stool and depress the lever again and the seat should then visibly rise, confirming that it has been assembled correctly.

Having successfully completed each of the steps, you will now have a fully functional bar stool. Instantly ready to use, you can sufficiently adjust the product to the required height and transfer it to your desired bar setting where it is guaranteed to be a welcome addition.
If you need any extra assistance when assembling your stools, you are welcome to give our customer services team a call and they will guide you through the process. Alternatively, take a look at our list of common assembly mistakes to avoid below:
6 Assembly Mistakes To Avoid:
1. Not removing the protective cap from the gas cylinder
On many of our stools there is a protective cap that needs to be removed before assembling the hydraulic column. There will usually be a label telling you to remove the cap if this is the case. If the cap is not removed it can get stuck, and this can prevent the variable height gas lift mechanism from working.
2. Not tightening screws evenly
All the screws should be tightened loosely first, and then tightened completely once the stool is positioned and levelled on the floor surface you intend to use it on. If a screw is fully tightened before all the screws have been aligned, this can result in some of the screws not lining up with the corresponding holes.
3. Not positioning the seat correctly
When attaching the seat to the column, the seat should be facing the same direction as the footrest. Often, the top of the column is angled in a way that allows the seat to recline back slightly and this can be used as a guide to make sure the seat is facing the right way. If it is positioned incorrectly, the footrest may be in the wrong place when you sit on the stool.
4. Not removing the screws from a flat base
Some of our flat base stools come with the screws already attached to the base, these need to be removed and used to assemble the stool.
5. Not positioning the spacers correctly
Some stools have spacers that need to be positioned between the screw holes in the seat and the plate at the top of the footrest column. The larger spacers are for the screw holes at the front of the stool, with the smaller ones at the rear. Some only have two spacers and these are for the front two holes. It’s worth noting that some stools do not require any spacers. If the spacers are positioned the wrong way around, the seat will feel as though it is tipping forward.
6. Not adjusting the footrest on certain stool designs
A selection of our stools, such as the Deluxe High Back Stool and the Eve Bar Stool, have an additional grub screw for the footrest. This needs to be secured in place when assembling and before using the stool.
Related Articles
Choosing What Colour of Bar Stool
The definitive guide to choosing the right colour stools for your and your space..
How to Disassemble a Bar Stool
Learn how to take apart your bar stools in just three simple steps..
How to Fix a Squeaky Bar Stool
Got a squeaky bar stool? Discover our top tips for stopping the squeak..
Maintaining Your Bar Stools
Learn everything you need to know about maintaining your new bar stools..


